Unplug the power, HDMI and any other cables from the rear of your PS4 console.
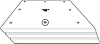
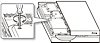
Place the console on a clean, flat surface in front of you. Turn it over and rotate the console so that the PlayStation Logo is facing away from you. Remove the cap from the screw hole directly above the PS Logo, as shown. (Newer consoles may not have this plastic cover).
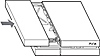
Insert the screwdriver into the manual eject hole and turn anti-clockwise to release the disc. This may require several turns of the screw. There is a layer of plastic that you will need to push through to remove the screw. Don’t worry – this won’t affect the warranty.
Reconnect the power, HDMI and any other cables that were disconnected in Step 1.
Power on the PS4 console to make sure everything is functioning properly.
Unplug the power, HDMI and any other cables from the rear of your PS4 console.
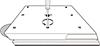
On a clean, flat, surface place the PS4 upside-down, and look for the hole directly above the PS Logo. (as shown, notice the PS Logo is upside-down).
Insert the screwdriver into the manual eject hole and turn anti-clockwise to release the disc. This may require several turns of the screw. There is a layer of plastic that you will need to push through to remove the screw. Don’t worry – this won’t affect the warranty.
Reconnect the power, HDMI and any other cables that were disconnected in Step 1.
Power on the PS4 console to make sure everything is functioning properly.
Unplug the power, HDMI, and any other cables from the back of your PlayStation 4 console.
Place the PlayStation 4 on a clean, flat surface in front of you, so the front of the console is on the left. (The PlayStation logo on the top of the PlayStation 4 should be on the right-hand side).
Place your palms on the top panel and let your fingers rest on the far side of the console.
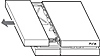
Apply moderate, even pressure near the seam with your palms, and using your fingers as leverage, slide the top panel away from you. A click will be heard, and the panel will move about 7mm. Lift the panel off starting from the left side.
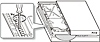
With the top panel removed, you'll see a screw with the PlayStation symbols on it. Remove this by turning the screw anti-clockwise to remove the HDD.
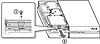
Pull the HDD part way out of the console so that the disc manual eject hole (1) is clear:
Insert the screwdriver into the manual eject hole and turn clockwise to release the disc.
Replace the top panel. Place it over the exposed section of the PlayStation 4, about 7mm away from the seam. Now slide the panel towards the seam until it clicks into place.
Reconnect the HDMI, power, and any other cables that were disconnected in the first step.
Power on the PlayStation 4 to make sure everything is functioning properly.
Turn off the PlayStation 4 console and disconnect it from the power supply.
Disconnect all cables from the rear of the console.
Place the console on a clean, flat surface in front of you, so that the front of the console is facing left. The PS logo on the top of the console should be the right way round.
Place your palms on the console’s glossy panel and let your fingers rest on the far side of the console.
Apply moderate, even pressure near the seam. Using your fingers as leverage, slide the glossy panel away from you.
You will hear a click and the panel will move a couple of centimeters/inches. Lift the panel off, starting from the left side
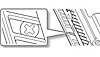
Once the glossy panel has been removed, you will see two sets of vents on the outer left edge of the console. Locate the first single vent (the one not grouped with other vents.)
Shine a light through this vent to locate the manual eject screw.
Slide the screwdriver into the vent and turn the screw anti-clockwise until the disc can be seen peeking out of the disc slot. This may require several turns of the screw. Very little effort is required to turn the screw.
Grab the disc by hand and pull it out of the disc slot.
Replace the glossy panel by positioning it over the exposed section of the console, a couple of centimeters/inches away from the seam.
Slide the panel towards the seam until it clicks into place.
Reconnect all the cables and turn on the console to check everything is working properly.