You can wear the VR headset over your glasses but take care when adjusting the scope. Having your glasses touch the lens could result in damage to your glasses, VR headset lens or both. Do not push in or pull out the scope excessively.
If you notice that PS VR environments are unclear or fuzzy while you’re wearing your glasses, try taking them off and readjust the scope position before you start play. Try playing with and without your glasses to find out what works best for you.
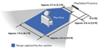
Limit your use of PS VR to within the Play Area. You can interact with games more directly because the camera captures the position, direction, and movement of your VR headset.
The PS VR aim controller is a Bluetooth® device. You’ll need to pair your controller when you use it for the first time and when you use it with another PS4™ console.
With your PS4 system on, connect your controller using a micro USB cable*, then press the 2 PS button. Your controller pairs with the system and turns on. After you’ve paired your controller, you can disconnect the micro USB cable and use your controller wirelessly.
*The PS VR aim controller is not supplied with a micro-USB. Use the micro-USB cable for your DualShock 4 wireless controller.
Disconnect the PS Camera and reconnect it. Long press the PS button and go to Sound/Devices. If the PS Camera is recognized, you will see the option Mute Microphone for PlayStation Camera on this menu.
If the PS Camera is still not recognized, keep the PS Camera connected and power down your PS4 console, and restart it.
Try to set up the PS Camera on another PS4 console, if possible.
If the problem persists after trying the above steps, the PS Camera needs to be repaired.